Kierowcy: Różnice pomiędzy wersjami
| Linia 7: | Linia 7: | ||
== Tworzenie kierowcy == | == Tworzenie kierowcy == | ||
| − | + | Kliknij w przycisk ''Nowy<u></u>''<u></u>, aby dodać nowego kierowcę. Określ następujące parametry: | |
| − | + | *Nazwa - imię i nazwisko kierowcy; | |
| + | *Kod - unikatory kod widoczny podczas śledzenia i w raportach. | ||
| + | *Opis - opcjonalny opis kierowcy. | ||
| + | *Numer telefonu - numer telefonu kierowcy. Będzie używany do wysyłania SMSów do kierowcy przez system. | ||
| − | |||
| − | |||
'''Phone number'''<br/>Enter driver's phone number. It will be shown in driver's tooltip and can be used to send SMS messages to the driver and make calls. Note that units or drivers with the same phone numbers cannot exist in the system. If you attempt to create a driver with a phone number that is already reserved to another driver or unit, a special alert will be displayed, and this phone number will not be saved. | '''Phone number'''<br/>Enter driver's phone number. It will be shown in driver's tooltip and can be used to send SMS messages to the driver and make calls. Note that units or drivers with the same phone numbers cannot exist in the system. If you attempt to create a driver with a phone number that is already reserved to another driver or unit, a special alert will be displayed, and this phone number will not be saved. | ||
Wersja z 13:53, 11 kwi 2016
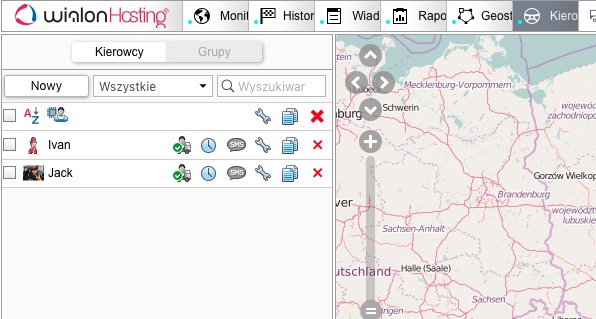
W tym panelu, możesz zarządzać listą kierowców w Twojej firmie. Jedno kliknięcie myszą może przydzielić kierowcę [[Obiekty|pojazdowi]]. W raportach pochodzących z pojazdu będzie wskazany jego kierowca przypisany w tym czasie.
Aby otworzyć panel Kierowcy, wybierz go z zakładek w górnym panelu.
Tworzenie kierowcy
Kliknij w przycisk Nowy, aby dodać nowego kierowcę. Określ następujące parametry:
- Nazwa - imię i nazwisko kierowcy;
- Kod - unikatory kod widoczny podczas śledzenia i w raportach.
- Opis - opcjonalny opis kierowcy.
- Numer telefonu - numer telefonu kierowcy. Będzie używany do wysyłania SMSów do kierowcy przez system.
Phone number
Enter driver's phone number. It will be shown in driver's tooltip and can be used to send SMS messages to the driver and make calls. Note that units or drivers with the same phone numbers cannot exist in the system. If you attempt to create a driver with a phone number that is already reserved to another driver or unit, a special alert will be displayed, and this phone number will not be saved.
Exclusive
If this flag is enabled, this driver can be the only one assigned to a unit. In case you bind this driver to a unit (in real time) which already has one or more assigned drivers, those drivers are reset automatically. This flag works only for drivers within a common resource.
Photo
To quickly identify a driver, you can attach their photo or any other image. To do this, press the Browse button and find and load an image from the disk. Supported formats are PNG, JPG, and GIF.
Custom fields
Create driver's card adding any information as custom fields. They are shown in driver's tooltip and can be summoned in reports. Note that custom fields with the same name cannot coexist within one particular driver.
At the end press OK. The new driver will appear on the list.
Przydzielanie kierowców
Several drivers can be assigned to one unit. To assign drivers to units, you need to have access flag 'Create, edit, and delete drivers' on the resource where those drivers belong.
The manual assignment can be performed in the Drivers panel. Use the corresponding switch button Bind / Unbind http://docs.wialon.com/en/local/1504/_media/icons/reset-driver.png to http://docs.wialon.com/en/local/1504/_media/icons/assign-driver.png http://docs.wialon.com/en/local/1504/_media/icons/reset-driver.png to attach and detach drivers to/from units. The button is disabled if http://docs.wialon.com/en/local/1504/_media/icons/grey-driver.png if your access is not sufficient.
Press the button Bind to unit and http://docs.wialon.com/en/local/1504/_media/icons/assign-driver.png and choose one of two options: Bind to unit or Register working shift. The first option is used if the assignment must be registered right in the moment. The second option is used to fix driver's work post factum. Select an option and press Next.
http://docs.wialon.com/en/local/1504/_media/drivers/drivers03.png
Choose a unit to bind a driver to. Availability of units in this list depends on the work list in the Monitoring panel.
If there are no units in the list, click 'Add all available' button http://docs.wialon.com/en/local/1504/_media/icons/add-all.png. If the list is still empty, then you have no access rights to these units.
http://docs.wialon.com/en/local/1504/_media/drivers/drivers04.png
If you register a working shift, there will be one more page where you indicate shift beginning and shift end (or one of them). For example, you can indicate just the beginning of the shift, and the end can be detected automatically when the unit arrives to garage (as a geofence) — to do this, create a notification of Geofence type with method of action Reset driver. In any case, when registering a working shift, you can use only past dates or current time (no future allowed).
http://docs.wialon.com/en/local/1504/_media/drivers/drivers05.png
The button Unbind from unit is http://docs.wialon.com/en/local/1504/_media/icons/reset-driver.png is used to remove driver from unit manually (the first option) or register a working shift in the same way as it was described above.
